An Example of a DIY Keplerian Beam Reducer (or Expander)


Please Wait
What is an example of a do-it-yourself Keplerian beam reducer?
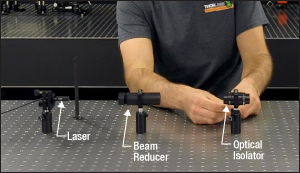
A beam reducer was designed and constructed for placement between a low-power continuous wave (CW) laser and a free-space optical isolator. The laser's wavelength was within the isolator's operating range, but the beam diameter exceeded the isolator's maximum specification. The design of the beam reducer was based on a Keplerian telescope and constructed using two positive lenses.

Click to Enlarge
Figure 1: A Keplerian beam reducer was designed and constructed to reduce the diameter of a laser beam, which was required to pass through an optical isolator's input and output apertures without clipping.

Click to Enlarge
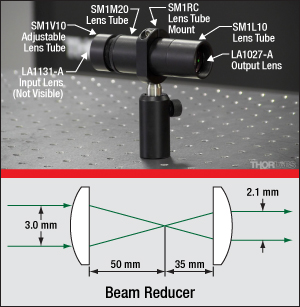
Figure 2: This beam reducer was fabricated using two positive focal length lenses separated by the sum of their focal lengths. The reduction ratio equaled the focal length of the output lens divided by the focal length of the input lens. The labeled components (top) were used to assemble the beam reducer, and the output beam diameter was adjusted by measuring it while adjusting the SM1V10 lens tube length.
Beam Diameter Requirements
The laser source was a PL201, which outputs a CW and collimated beam with a wavelength of 520 nm and typical optical output power of 0.9 mW. At a distance 5 cm from the laser, a circle 3 mm in diameter would contain over 99% of the beam's power.
However, a specification for the free-space optical isolator
Reduction Ratio and Lens Choice
Beam reducer designs are often based on two-lens Keplerian or Galilean telescopes. Both approaches would provide similar performance in this application, but a Keplarian design was chosen to take advantage of the ease of using ray tracing geometry to graphically block out lens placements and show the output beam diameter (Figure 2, bottom).
Plano-convex lenses with 1" diameters, anti-reflective coatings, and positive focal lengths were chosen. Selecting lenses with large clear apertures compared with the beam diameter minimized aberrations, as did orienting the lenses so that their curved sides faced collimated beams and their flat sides faced the beam focus (Figure 2, bottom). In addition, 1" diameter optics are directly compatible with 1" diameter lens tubes and related accessories.
The target reduction ratio
Effect of Beam Reduction on Divergence Angle
A beam reducer shrinks the diameter of the beam waist but increases the divergence angle. Although the beam diameter would be 2.1 mm near the output face of the beam reducer, diffraction effects would cause the beam diameter to increase as it propagates. In this application, the beam diameter must be less than 2.7 mm in diameter after propagating across ~18 cm of free space to enter the isolator without clipping.
To investigate whether the reduced beam would meet the isolator's input diameter specification and travel through the isolator without clipping, the laser beam's waist diameter

 is the wavelength of the laser light

at the input to the isolator. The distance used in the equation was then increased
Construction
The ideal beam reducer design (Figure 2, bottom) assumes the input beam waist is one focal length (50 mm) away from the curved input side of the left lens. Under these conditions, the light focuses to a point that is one focal length away from the planar output side of the lens, as illustrated. When this input condition is not met, which is the case in this work, the focal point of the beam output by the first lens will not be exactly 50 mm away, and the diameter of the beam provided by the beam reducer will differ from the ideal calculated value. In order for the beam reducer to provide the specified beam diameter over the required distance, it may be necessary to adjust the spacing between the two lenses from the ideal design values. In this application, the housing was constructed to allow this spacing to be tuned.
The housing that secured and positioned the two lenses approximately 85 mm (3.4") apart from each other was constructed using lens tubes (Figure 2). As seen in this figure, the curved sides of the lenses faced the directions of the collimated light. A 3" tube was fabricated by attaching two fixed-length lens tubes, 1" (SM1L10) and 2" (SM1M20) together. The 35 mm lens was secured within the 1" lens tube. An adjustable lens tube (SM1V10), which held the 50 mm focal length lens, supplied the required additional length and allowed the distance between the two lenses to be optimized. The assembly was held in a lens tube mount (SM1RC) during the alignment of the isolator.
Want to see how this beam reducer was used?
Watch the full video.
|
Looking for more Insights? |
Date of Last Edit: June 18, 2021 |
| Posted Comments: | |
| No Comments Posted |
 Products Home
 DIY Keplerian Beam Reducer