Educational Atomic Force Microscope (AFM)

- Designed for Education, Demonstration, and Classroom Use
- Easy-to-Use Kits Include Components Plus Free Educational Materials
Breadboard Not Included

Please Wait
Educational Atomic Force Microscope
- Designed for Education, Demonstration, and Classroom Use
- Complete Photonics Kit Includes All Hardware Except Breadboard Plus Extensive Manual and Teaching Materials
- Easy to Assemble and Use
- Choose from Educational Kits Containing Imperial or Metric Components
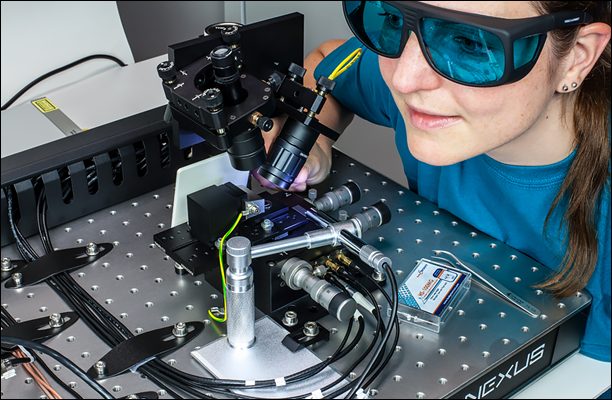
Click to Enlarge
The laser beam collimation in the EDU-AFM1(/M) Education Kit is being adjusted.
Experiment
- Build an Atomic Force Microscope
- Learn about the Fundamental Forces between Atoms at the Probe Tip and Sample Surface
- Learn About Nanometer-Precision Motion Control and Hysteresis with Piezo-Driven Actuators
- Understand the Principles Behind Various Scanning Methods such as Constant Height and Constant Force Mode
- Includes CD, DVD, and Blu-Ray Disc Samples as well as Microstructure for Calibration
Thorlabs' Educational Atomic Force Microscope (AFM) includes all of the components* needed for students to build a basic atomic force microscope in the lab. This teaching system allows students to handle and adjust the setup while performing experiments to image one of the included samples. While not a research grade instrument, the system can achieve sufficient resolution to demonstrate the physical properties of and technology used in AFMs. It is capable of imaging in constant height, constant force, and lateral force mode, as well as recording force-distance curves.
In addition to the microscope components, the educational kit includes:
- Intuitive EDU-AFM Software Package for Microscope Control via a PC Running a Windows® Operating System
- Microstructure Calibration Sample
- 10 Contact Mode AFM Probes
- CD, DVD, and Blu-Ray Disc Samples at No Additional Cost
- Extensive Manual with Instructions for Building the AFM, Theory of Operation, and Student Exercises
Together, these features make Thorlabs' educational atomic force microscope a broad-based, application-oriented setup that is an ideal introduction for advanced undergraduate students.
*The AFM must be mounted on an optical table or breadboard, which is not included in this kit. If your lab does not already have a suitable one, we recommend using the B1824F Nexus® Honeycomb Breadboard with the AV5 Damping Feet for the imperial kits (B4560A with AV5/M, respectively, for metric kits), which are available for purchase separately below. Do not use a standard aluminum breadboard, as it will not sufficiently isolate the AFM from vibrations.
Thorlabs Educational Products
Thorlabs' line of educational products aims to promote physics, optics, and photonics by covering many classic experiments, as well as emerging fields of research. Each educational kit includes all the necessary components and a manual that contains both detailed setup instructions and extensive teaching materials. These lab kits are being offered at the price of the included components, with the educational materials offered for free. Technical support from our educational team is available both before and after purchase.
Purchasing Note: English and German language manuals/teaching information are available for this product. The imperial kit contains the English manual and US-style power cord. The appropriate manual and power cord will be included in the metric kit based on your shipping location. The power supplies and other electronic devices in both the metric and the imperial kit accept voltages of 230 VAC and 120 VAC. Some power supplies include a switch for selecting the mains voltage. See the respective manuals for details. Please contact Tech Support if you need a different language, cord style, or power supply. As with all products on our website, taxes are not included in the price shown below.
Laser Safety
Thorlabs' Atomic Force Microscope Educational Kit uses a 635 nm, 2.5 mW Class 3R laser, which necessitates that all users be trained and follow all necessary safety protocols. This includes wearing laser safety glasses.
We would recommend discussing your needs with your organization's laser safety officer. More details about the laser classification system and Thorlabs laser safety products can be found on the Laser Safety tab.
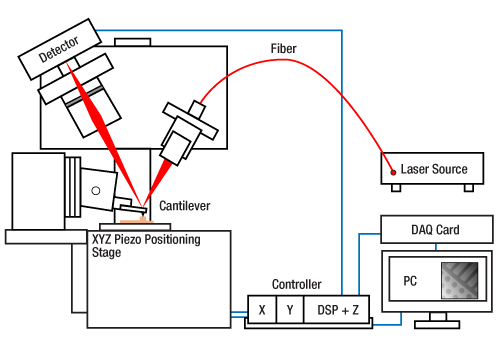
A Schematic of the EDU-AFM1(/M) Educational Atomic Force Microscope. The red lines represent the path of the laser light and the blue lines represent electrical connections.
Thorlabs demonstration/educational atomic force microscope (AFM) kit is designed for classroom, lab, and other educational uses. It features an AFM probe, a sample holder on a motorized stage with motorized closed-loop positioning control, a laser and four-segment photodiode detector for measuring the probe deflection, and the intuitive EDU-AFM software package to control the setup.
Operation
AFM measurements use a probe, comprised of a flexible cantilever that supports a nanometer-scale tip, to scan the surface structure of samples. The schematic to the right illustrates how the EDU-AFM1(/M) Educational AFM operates. Laser light is provided by a 635 nm fiber-coupled benchtop source. A patch cable feeds the laser light into a collimator consisting of a lens in an adjustable zoom housing. This collimator is mounted on a 3-axis kinematic mount so that the focused laser spot can be centered on the cantilever surface. Light reflected from the cantilever enters the detector mount assembly, where it is again focused onto the surface of a four-segment photodiode. The voltage measurement from the photodiode provides a measurement of the cantilever deflection that can either be used directly to create an image or in a feedback loop to control the height of the sample stage.
Sample Stage and Cantilever
In the EDU-AFM1(/M), the probe remains stationary while a sample is moved underneath the probe tip using a MAX311D(/M) 3-Axis Stage with Closed-Loop Piezos. The probe is held in a custom mount secured to an AMA009(/M) Platform that connects to the stationary side of the MAX311D(/M), as shown in the image below. KPZ101a K-Cube Piezo Controllers are used to drive each axis of the sample stage. The piezo controllers for the X and Y axes are each paired with a KSG101a Strain Gauge Reader, which measures the piezo deflection. Together, these K-cubes provide closed-loop control to accurately set and maintain the stage position in X and Y. The KPZ101 used for Z-axis control is connected to a KPA101 K-Cube Position Sensing Detector Auto Aligner with an internal digital signal processor (DSP) that is used to monitor the cantilever deflection, as explained below.
- This previous-generation item is not available for individual purchase. Please contact Tech Support if a replacement is needed.
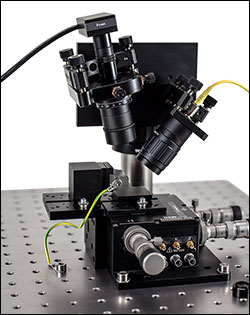
Click to Enlarge
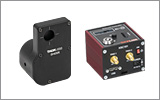
Laser Collimation (Top Right), Cantilever (Center), and Detector Mount (Top Left) Assemblies
Image Acquisition and Measurement Modes
Before beginning a scan, the system is set up so that the light reflected from the cantilever is incident on the center of the four-segment photodiode detector. As the sample is scanned, the cantilever will begin to deflect, moving the spot away from the center of the detector and changing the output voltage signals. Depending on the scanning mode, this output voltage signal is used in different ways. In Constant Height Mode, the voltage signal is used directly as height information. The EDU-AFM software pairs each voltage measurement with the XY position on the sample to create a contour map of the surface.

Ideas for Modifying the Kit?
We strongly encourage users to make their own modifications to our kits to enhance or expand the kits' capabilities, including adding or altering components. If you would like to share your modifications with the community, let us know and we will add your ideas with a reference to the kit webpage.
In Constant Force Mode, the system is set up to keep the cantilever deflection constant: this is accomplished by setting up a closed feedback loop between the photodiode, the DSP in the auto aligner, and the Z-axis piezo controller. When the four segment photodiode detects a change in the laser spot position, the DSP in the auto aligner calculates the adjustment to the sample height needed to maintain the initial cantilever deflection. This signal is used by the EDU-AFM software as height information, combined with the data from the X- and Y-axis piezo controllers, to create a contour map of the sample surface.
In addition to these two scanning modes, the EDU-AFM1(/M) can also measure the lateral forces on the cantilever and the way forces on the cantilever change as the sample surface is approached. For more information on AFM scanning modes, see the AFM Basics tab.
Laser Safety Information
The class 3R laser used in this kit emits in excess of 2.5 mW of optical power, which can cause damage to the eyes if viewed directly. We recommend wearing appropriate laser safety glasses when using this kit. See the Laser Safety tab for details.
| Atomic Force Microscope Specifications | |
|---|---|
| Image Acquisition | |
| Scan Area | 0.05 µm x 0.05 µm (Min) 20 µm x 20 µm (Max) |
| Sampled Pixels per Line | 50, 100, 250, or 500 |
| Scan Speed | 1 Pixel/s (Min) 200 Pixels/s (Max) |
| Time per Image (Examples) | 4 Minutes for 100 x 100 Pixels Sampled at 100 Pixels/s 11 Minutes for 250 x 250 Pixels Sampled at 200 Pixels/s 25 Minutes for 500 x 500 Pixels Sampled at 200 Pixels/s (Forward Only) |
| Resolution | For the educational AFM we refrain from giving a resolution limit due to varying setup alignments. Typically, features on the scale of 10 nm can be distinguished.a |
| Properties and Modes | |
| AFM Tips | Recommended: Al-Coated Cantilever (10 Tips from BudgetSensors Included with Kit)b Standard Contact Cantileversc are also Usable |
| AFM Modes | Constant Force Constant Height Lateral Force Force-Distance Curves |
| Feedback Systems | XY Closed-Loop Piezo Stage with KSG101d Strain Gauge Reader |
| Tip Engagement on Surface | Manual Approach with Differential Adjusters with Assisted Piezo Feedback Compensation |
| Laser Wavelength | 635 nm |
| Laser Output Power | 0.01 to 2.5 mW |
| PC Requirements | |
| Operating System | This software was verified with the following platforms: - Windows® 7 SP1 updated with KB3020369 and KB3125574 (32-Bit, 64-Bit) - Windows® 10 (64-Bit) - Windows® 11 (64-Bit) |
| Additional Software | Microsoft .Net Framework 4.6.2 Full Profile or higher version is required. The install program will check and download it from the internet if necessary. |
| USB Ports | Three USB 2.0 |
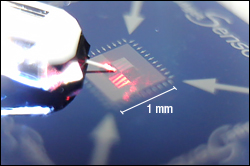
Click to Enlarge
This image was taken with the digital microscope included in the AFM kit and shows the laser focused on the cantilever.
What is Atomic Force Microscopy?
Atomic force microscopy, a form of scanning probe microscopy, offers fascinating insights into structures beyond the resolution limits of optical microscopy and therefore into the world of nanostructures. The scanning method is based on a fine scanning probe, which consists of a flexible arm called a cantilever that supports a tip radius less than 10 nm. As the tip interacts with the surface of a sample, the deflection of the cantilever is recorded in order to create an elevation profile of the surface line by line. For an atomic force microscope (AFM) to function properly, the cantilever must meet several requirements. A low spring constant is needed so that small forces can be measured. It must have a large resonance frequency to minimize the influence of mechanical oscillations. Therefore, the cantilever must both have low mass and a small size.
In the EDU-AFM1(/M), the light from a laser source is focused onto the cantilever by a focusing lens in an adjustable zoom housing. The light reflected from the cantilever strikes a position-sensing detector (four-segment photodiode). When the cantilever is deflected during scanning due to a change in the surface height, the corresponding deflection of the laser beam is measured, and then read and processed by the digital signal processor (DSP). Depending on the scanning mode used (detailed below), the deflection-dependent voltages from the four-segment photodiode can be used as height information to create a contour map of the sample surface or as a feedback signal between the DSP and a z-axis positioning unit supporting the sample. In the latter case, the Z-axis positioning unit can be used to adjust the height of the sample to maintain a constant cantilever deflection (as measured by the four segment photodiode), and a contour map the sample surface is created by recording the changes in the stage height.
Measurement Modes
All AFM scanning modes are based on the interaction between the probe tip and the sample, but different aspects of this interaction can be probed when examining a sample. In general, AFM modes can be divided into two categories. In contact scanning modes, the cantilever tip is dragged across the surface of the sample and the effects on the deflection of the cantilever are measured. In dynamic scanning modes, the tip of the cantilever is forced to oscillate and the effects of this oscillation are measured. The EDU-AFM1(/M) is only capable scanning in a contact mode, so we will focus on the two types of contact modes here: constant height mode and constant force mode.
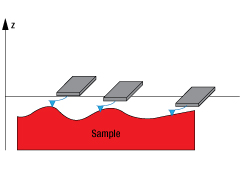
Figure 2: In Constant Force Mode, the cantilever deflection remains constant and the movement of the probe holder (or sample) needed to maintain that deflection is measured.
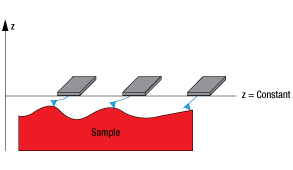
Figure 1: In Constant Height Mode, the sample height remains constant and the cantilever deflection is measured.
Constant Height
Constant height mode is the simplest scanning method since it only requires the measurement of the cantilever deflection. The sample and cantilever are held at a constant distance from each other and the probe tip is scanned over the surface of the sample, as illustrated in Figure 1. The deflection of the cantilever is measured, and this is used to create a contour map of the sample surface. The downside is that this method only works for relatively flat samples, as the motion of the cantilever is limited by the size of the cantilever and its flexibility. Deep structures can result in a loss of contact with the sample or cause damage to or deformation of the cantilever or sample.
Constant Force
Constant force mode, illustrated in Figure 2, uses a feedback mechanism to adjust either the probe or sample height in order to maintain a constant cantilever deflection. In the case of the EDU-AFM1(/M), the deflection of the cantilever is measured by the four-segment photodiode, and a DSP uses resulting feedback to calculate the Z-piezo voltage needed to keep the deflection constant. This Z-piezo control voltage is recorded and used to create a contour map of the sample surface. This scanning method can probe deeper surface structures than constant height mode without a loss of contact or damage to the cantilever or sample, as the force acting on the cantilever is constant.
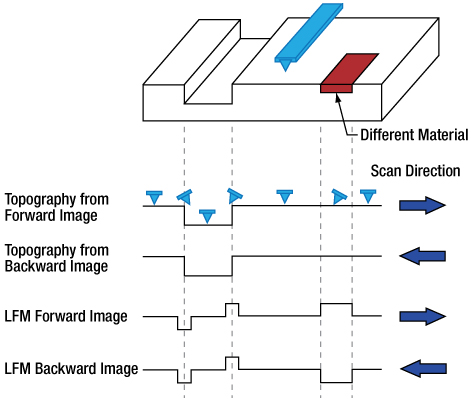
Figure 3: In lateral force mode, the torsion of the cantilever is measured instead of the deflection. The tip torsion will behave differently than the deflection for changes in sample surface height and changes in the sample surface material.
Lateral Force Measurement (LFM)
When performing scans in constant force or constant height mode, additional information can be gathered from the torsion of the cantilever. This most commonly occurs at steep edges in the sample, or due to changes in friction at the sample surface caused by a change in the material. This deflection caused by torsion of the tip will be perpendicular to the deflection caused by changes in sample feature height, allowing the two signals to be separated. Figure 3 provides a comparison between the different profiles that result when a lateral force measurement is taken.
Force-Distance Curves
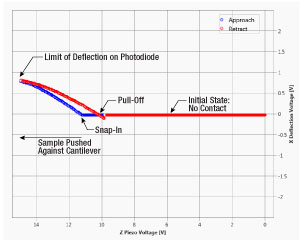
In addition to topography measurements, atomic force microscopes can also record force-distance curves, which serve as an important tool in many sciences including biochemistry and biology. These curves measure the change in force as the probe tip approaches the sample surface, which can be used to determine physical characteristics such as the modulus of elasticity. When conducting a force-distance measurement, the sample is moved towards the probe tip before being retracted. This causes the cantilever to deflect in response to the forces near the sample surface as illustrated in Figure 4, and this deflection is recorded as a function of the distance between the probe and the sample.
As the sample is moved towards the probe, there will be a point where attractive forces cause the tip to engage with the sample (Snap-In). The sample continues to move towards the probe until the cantilever straightens, and is then deflected upward. Then, the sample is moved downwards again. The probe tip will remain engaged with the sample surface until the restoring spring force of the cantilever is greater than the adhesive forces between the tip and the sample, at which point the cantilever will return to its rest position (Pull-Off). Note that the height of the sample at Snap-In and Pull-Off are not the same.

Figure 4: This schematic illustrates how the cantilever deformation changes during a Force-Distance Measurement. The red arrows indicate the motion of the sample relative to the probe holder, while the blue arrows indicate the motion of the cantilever. The green arrows indicate the difference in sample height between when the cantilever first engages with the sample (Snap-In) and when the cantilever disengages with the sample (Pull-Off).
Click to Enlarge
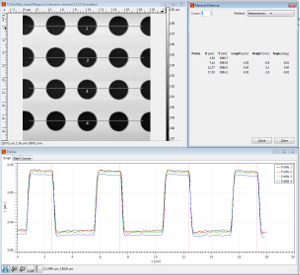
Screenshot of the Gwyddion Software During the XY Calibration Procedure
After students construct the educational AFM, they can complete a series of exercises outlined in the manual to practice different scanning methods and familiarize themselves with post-processing techniques in Gwyddion (see the Software tab). This tab includes a brief summary of the experiments included with the EDU-AFM1(/M) kit, with exercise numbers that match the manual.
Lateral Calibration using the Included Microstructure
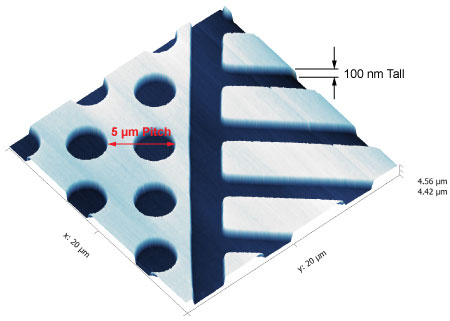
The AFM can be calibrated using the included microstructure to enhance the measurement accuracy. Through this set of exercises, students learn how to check or redo the calibration. Lateral calibration allows for the instrument to accurately record the location of each data point in X and Y. The microstructure sample is designed specifically for this purpose with 100 nm tall features that are arranged with a pitch that varies between 5 µm and 10 µm.
Exercise 1.1: Measure the circle structure of the microstructure sample in a 20 µm x 20 µm scanning window in constant force mode with the default calibration settings. Measure the same image with strain gauge feedback enabled and disabled.
Exercise 1.2: Use the Gwyddion software to determine the structure pitch in the X and Y directions, and calculate the feature size compared to the datasheet information in %.
Exercise 1.3: Enter the calibration data from Exercise 1.2 into the EDU-AFM software, and record the same image again to check the calibration results.
Click to Enlarge
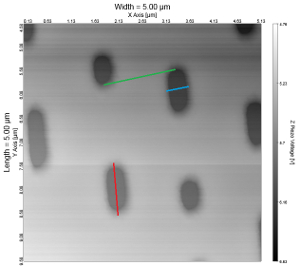
This image of a CD was taken with the EDU-AFM1. The pit length (red line), pit width (blue line), and track width (green line) are marked.
Topography of CD, DVD, and Blu-Ray Discs
This kit includes CD, DVD, and Blu-Ray disc samples that were taken out of the production process prior to encapsulation. This means that the stamped surface is accessible and ready for a surface scan. Students can image each type of disc, measure the surface features, and compare the data densities of the different encoding methods
Exercise 2.1: Record an image of the CD surface in constant force mode.
Exercise 2.2: Record an image of the DVD in constant force mode.
Exercise 2.3: Record an image of the Blu-Ray disc in constant force mode.
Exercise 2.4: Determine the track width, track pitch, minimum and maximum pit length of the CD, DVD and Blu-Ray disc.
Exercise 2.5: Determine the pit depth using the profile function in Gwyddion. Compare the pit depths of the CD, DVD and Blu-ray samples and explain why they are different.
Exercise 2.6: Calculate the maximum storage capacity of a CD.
Lateral Force Measurement
Students practice taking lateral force measurements with the AFM using the included microstructure sample and a human hair.
Exercise 3.1: Scan the microstructure sample in constant height mode, recording a lateral force image in a 20 µm x 20 µm scan area. Interpret the profile information.
Exercise 3.2.1: Record the topography of a human hair. Scan the hair in constant force mode.
Exercise 3.2.2: Record a lateral force image of a hair in constant height mode.
Click to Enlarge
A screenshot from the EDU-AFM software showing a force-distance measurement. The key features of the curve have been labeled.
Force-Distance Measurement
This series of exercises familiarizes students with force-distance measurements. These measurements can be used to determine the adhesion force between the tip and the sample surface, as well as the modulus of elasticity. The cantilever spring constant can also be calculated.
Exercise 4.1: Record a force-distance curve (without zoom) of the microstructure sample and determine the rest position, snap-in, and pull-off. What effects are observable?
Exercise 5.1: Determine the spring constant of the cantilever.
Exercise 6.1: Measure the force-distance curve of various samples (for example: stainless steel, plastic or rubber). Label the most interesting points of a force-distance curve.
Exercise 6.2: Determine the maximum adhesion force.
Exercise 7.1: Compare the deflection of the cantilever with a hard (non-deformable) sample to the sample for which you want to estimate the modulus of elasticity.
Exercise 7.2: From Exercise 7.1, determine the depth of the cantilever deflection compared to the reference sample and use this to estimate Young's modulus of elasticity.
Atomic Force Microscope Kit Components
The EDU-AFM1(/M) must be mounted on an optical table or breadboard. As these are common in many labs, we have not included a breadboard in this kit. If you need to purchase a breadboard separately, we recommend the B1824F Nexus® Honeycomb Breadboard with the AV5 Damping Feet for the imperial kits (B4560A with AV5/M, respectively, for metric kits), which are available separately below.

Thorlabs' Atomic Force Microscope Kits are available in imperial and metric versions. In cases where the metric and imperial kits contain parts with different item numbers, metric part numbers and measurements are indicated by parentheses unless otherwise noted.
| Item # | Description | Qty. |
|---|---|---|
| Laser, Fiber, and Mounting | ||
| S1FC635a | Fiber-Coupled Laser Source, 635 nm, 2.5 mW | 1 |
| P1-630A-FC-1 | Single Mode Fiber | 1 |
| F280FC-B | Fiber Collimator | 1 |
| KS1T | Kinematic Mount, 3 Adjusters | 1 |
| SM1L05b | SM1 Lens Tube, 1/2" Long | 1 |
| SM1NR05 | Adjustable Lens Tube for 1/2" Optics | 1 |
| AD11F | SM1-Threaded Collimator Mounting Adapter | 1 |
| LA1213-A | Ø1/2" Plano-Convex Lens, f = 50.0 mm | 1 |
| Detector, Controller, and Mounting | ||
| PDQ80A | Four-Segment Photodiode | 1 |
| KPA101 | Auto Aligner with Digital Signal Processor (DSP) | 1 |
| K6XS | 6-Axis Kinematic Mount | 1 |
| SM05CP2 | SM05-Threaded End Cap | 1 |
| SM1A6 | SM1 to SM05 Adapter | 1 |
| SM05L10 | SM05 Lens Tube, 1" Long | 1 |
| SM05T2 | SM05 Lens Tube Coupler | 1 |
| SM05L05 | SM05 Lens Tube, 1/2" Long | 1 |
| LA1422-A | Ø1" Plano-Convex Lens, f = 40.0 mm | 1 |
| DG05-1500 | Ø1/2" Glass Diffuser Plate | 2 |
| SM1L05b | SM1 Lens Tube, 1/2" Long | 1 |
| SM1V05 | SM1 Adjustable Lens Tube | 1 |
| SM1L03 | SM1 Lens Tube, 0.3" Long | 1 |
| SM05L03 | SM05 Lens Tube to Hold Diffuser Plate | 1 |
| Damped Post and Adapter Plate | ||
| DP8A (DP8A/M) | Ø1.5" Damped Post | 1 |
| - | Mounting Clamp, 2.5" x 2.5" (64 mm x 64 mm) | 1 |
| - | Adapter Plate | 1 |
| PSHA (PSHA/M) | Ø1.5" Adjustable Height Collar | 1 |
| Item # | Description | Qty. |
|---|---|---|
| Sample Stage and Cantilever Holder | ||
| MAX311D (MAX311D/M) | 3-Axis NanoMax Stage, Differential Drives, Closed-Loop Piezos |
1 |
| KPZ101c | Piezo Controller | 3 |
| KSG101c | Strain Gauge Controller | 2 |
| KCH601d | K-Cube Controller Hub | 1 |
| HWM003 | Sample Support | 1 |
| AMA009 (AMA009/M) | Extension Platform | 1 |
| - | Mounting Block | 1 |
| KB1X1 (KB25/M) | Magnetic Holder | 1 |
| - | Probe Holder | 1 |
| - | Probe Holder Counter Piece | 1 |
| Accessories | ||
| - | Tweezers | 1 |
| - | Calibration Sample: BudgetSensors HS-100MG | 1 |
| - | Al-Coated Cantilever (Box of 10) | 1 |
| CA2824 | Male SMA to BNC Cable, 24" | 3 |
| - | Label Sheet | 1 |
| - | Digital Microscope | 1 |
| - | Viewing Screen | 1 |
| TRP1.17 (TRP29/M) | Ø0.47" Pedestal Post | 1 |
| MSC2 | Clamping Fork for Ø0.47" Posts | 1 |
| AM16C (AM16C/M) | 16° Angle Block | 1 |
| - | National Instruments 6002 USB DAQ Card | 1 |
| - | BNC to DAQ Connection | 3 |
| CS1 | Cable Clamps (Qty. 15) | 1 |
| - | Cable Duct | 1 |
| CL6 | Table Clamp | 4 |
| - | CD Sample | 1 |
| - | DVD Sample | 1 |
| - | Blu-Ray Sample | 1 |
| - | Ruler | 1 |
| - | USB Stick w/ EDU-AFM Software Package | 1 |
| - | Ground Cable | 1 |
Imperial Kit: Included Hardware and Screws
| Item # | Description | Qty. | Item # | Description | Qty. |
|---|---|---|---|---|---|
| Screws and Washers | |||||
| SH25S025e | 1/4"-20 Cap Screw, 1/4" Long |
31 | SH8S025g | 8-32 Cap Screw, 1/4" Long |
1 |
| SH25S038e | 1/4"-20 Cap Screw, 3/8" Long |
11 | - | 8-32 Cap Screw, 5-16" Long |
1 |
| SH25S050e | 1/4"-20 Cap Screw, 1/2" Long |
3 | SH8S038g | 8-32 Cap Screw, 3/8" Long |
4 |
| SH25S063e | 1/4"-20 Cap Screw, 5/8" Long |
8 | - | 8-32 Cap Screw, 5/8" Long |
1 |
| W25S050f | 1/4" Washer | 45 | - | 2-56 Countersunk Head Screw, 1/4" Long |
3 |
| Hex Keys, Ball Drivers, and Spanner Wrenches | |||||
| BD-3/16L | 3/16" Balldriver | 1 | SPW606 | SM1 Spanner Wrench | 1 |
| BD-9/64 | 8-32 Ball Driver | 1 | SPW603 | SM05 Spanner Wrench | 1 |
| CCHK | Hex Key Set | 1 | - | ||
Metric Kit: Included Hardware and Screws
| Item # | Description | Qty. | Item # | Description | Qty. |
|---|---|---|---|---|---|
| Screws and Washers | |||||
| SH6MS06e | M6 Cap Screw, 6 mm Long |
31 | SH4MS06g | M4 Cap Screw, 6 mm Long |
1 |
| SH6MS10e | M6 Cap Screw, 10 mm Long |
11 | - | M4 Cap Screw, 8 mm Long |
1 |
| SH6MS12e | M6 Cap Screw, 12 mm Long |
3 | SH4MS10g | M4 Cap Screw, 10 mm Long |
4 |
| SH6MS16e | M6 Cap Screw, 16 mm Long |
8 | SH4MS16g | M4 Cap Screw, 16 mm Long |
1 |
| W25S050f | M6 Washer | 45 | - | M2.5 Countersunk Head Screw, 6 mm Long |
3 |
| Hex Keys, Ball Drivers, and Spanner Wrenches | |||||
| BD-5ML | 5 mm Balldriver | 1 | SPW606 | SM1 Spanner Wrench | 1 |
| BD-3M | 3 mm Balldriver | 1 | SPW603 | SM05 Spanner Wrench | 1 |
| CCHK/M | Hex Key Set | 1 | - | ||
Software
Each kit includes a USB stick with the free EDU-AFM software package, used to control the AFM and record measurements. The software features a graphical representation of the Four Segment Photodetector, as well as separate tabs for each measuring mode. Measurements can be saved as an image or in data format. If the original USB stick is lost, please contact Tech Support for another copy of the software. Future software updates will be made available for free, and can be accessed through the EDU-AFM's Software Update function.
Gwyddion
The kit also makes use of Gwyddion, a popular image processing program for AFM measurements. A tutorial for importing data in Gwyddion and image post processing tips are provided in the EDU-AFM1(/M) manual. The package can be downloaded here.

Click to Enlarge
A graphical representation of the four segment photodiode in the EDU-AFM software. The voltage produced by the four-segment photodiode by the laser total intensity (SUM) and the laser position (XDIFF/YDIFF) appear in the upper right hand corner of the graph. The XY position of the stage, as well as the feedback from the strain gauge and z-axis controller, appear in the side bar.

Click to Enlarge
An example measurement of the microstructure sample in Constant Force Mode.

Click to Enlarge
An example of a force-distance curve. The stage moves upwards by 4 µm (15 V), and the cantilever deflection as it interacts with the sample is measured. This data can be used to calculate the adhesion forces and Young's modulus of the material.
Assembly of the EDU-AFM1(/M) kit. The breadboard is not included, but can be purchased separately below.
| Drawings and 3D Modelsa | ||
|---|---|---|
| Document Description |
EDU-AFM1 | EDU-AFM1/M |
| Auto CAD PDF | ||
| Auto CAD DXF | ||
| Solidworks | ||
| eDrawing | ||
| Step | ||
Kit Assembly
The video to the right shows the steps for assembling the EDU-AFM1(/M) kit. The video speed can be adjusted by clicking on the gear icon in the lower right-hand corner of the player.
A mechanical drawing and 3D models of the setup in the video are provided through the links to the right. Please note that while the drawings and solid models show a breadboard, one is not included in the kit as breadboards and optical tables are a staple in many labs. A B1824F Nexus® Honeycomb Breadboard for the imperial kit or B4560A Nexus® Honeycomb Breadboard for the metric kit can be purchased separately below; a standard aluminum breadboard should not be used with the kit as it will not sufficiently isolate the AFM from vibrations.

Click to Enlarge
2D Image Taken with EDU-AFM Software
Tip Engagement of the AFM Kit
The video to the right shows how a sample can be manually adjusted to engage the tip of the AFM probe.* Differential screws with both coarse and fine adjustment are used in combination with a height feedback sensor for gentle contact that does not damage the tip of the probe. The camera has high magnification so that the sub-millimeter thick tip can be seen in the software during its approach to the sample. Once the sample is engaged with the tip, the video shows the AFM kit scanning in constant force mode. Note that the USB camera is capable of showing the scanning movement of the cantilever. An example image is shown to the right. For more example images, please see the Image Gallery tab.
*Please note that the video shows a previous version of Thorlabs' EDU-AFM1(/M) software GUI. However, the functionality remains the same.
Changing the Cantilever Tip

Click to Enlarge
This image was taken with the digital microscope included in the AFM kit and shows the laser focused on the cantilever.
Changing the AFM Probe
Over time, the tip of the AFM probe will wear, eventually leading to a tip diameter that is larger than the expected features or image artifacts. When this happens, the probe should be changed, as demonstrated in the video to the right.
The EDU-AFM1(/M) kit includes 10 BudgetSensors
*BudgetSensors cantilevers can be found here.
Customization Possibilities
The open and modular nature of Thorlabs' Educational Atomic Force Microscope kit lends itself to user modifications, making it an excellent platform for prototyping novel research applications. Below are two examples of what can be done.
Click for Details
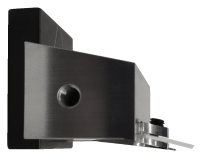
Figure 1: An AFM Tip Holder Modified to Hold a Glass Slide
Modifying the EDU-AFM1(/M) for Use in Liquids
The kit only requires minimal modifications to enable measurements in liquids, which is beneficial for biological applications where drying the sample may destroy it.
To this end, the tip holder that is included with the kit was modified by adding a groove and an M3-tapped through hole. The groove allows the insertion of a
1 cm x 1 cm glass slide (0.6 mm thickness), and the tapped hole enables an M3 setscrew to secure the glass slide, as shown in Figure 1*. The setup utilizes the liquid's surface tension on the glass slide to produce a stable interface through which the laser passes.
*Please note that the tip holder is not typically anodized.
 Figure 2c: Immersed Sample Being Scanned as the Laser Reflects from the Cantilever after Passing through the Glass Slide and Liquid
 Figure 2b: Modified Holder Producing a Stable Liquid-Glass Interface While Approaching the Immersed Sample
 Figure 2a: Sample Immersed in Liquid Prior to Approach
A drop of liquid is added on top of the included calibration sample, as shown in Figure 2a. When approaching such a sample, the glass slide creates two stable and planar interfaces, from air-glass then glass-liquid (see Figure 2b), that do not change while the sample is scanned. One can even see the path of the laser through the liquid in Figure 2c. After realignment of the laser spot to the cantilever, measurements can be performed identically to the dry case.
 Click to Enlarge
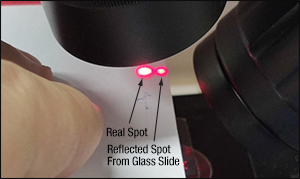
Figure 4: A second, weaker spot is generated by reflection on the top surface of the glass slide (right spot). This does not negatively impact the measurements.
The calibration sample was scanned in air and in water to compare the performance, as depicted in Figure 3a and Figure 3b, respectively. As mentioned above, the performance is shown to have negligible differences in air and in water. A data file is provided for a typical lineout on the sample for both the water and air cases.
Please note that a second spot is generated due to the reflection of the laser on the glass slide, as shown in Figure 4. This second spot will reach the detector but it is weaker than the primary spot. Furthermore, it does not move when the sample is scanned and therefore does not affect the measurements.
Customization with Different Hardware and Software Configurations
As the K-Cube Controllers in the EDU-AFM1(/M) kit can be controlled by any software written in .NET-compatible languages (e.g., C# or LabVIEW), as well as using its own analogue interface, they can easily be adapted to different hardware and software configurations.
As an example, Petr Klapetek and colleagues from the Czech Metrology Institute and Polish Central Office of Measures used a self-developed AFM controller called Gwyscope (based on a Red Pitaya FPGA board), shown in Figure 5, and a self-written software. These changes improved the scanning speed of the kit and enabled advanced scan paths, such as spiral or interleaved scans, by directly reading the output of the strain gauge controllers. This required the addition of a third KSG101* controller for the Z-axis. Figure 6 shows the complete setup and Figure 7 shows a spiral scan taken on the test sample included with the kit. A spiral scan path minimizes stage acceleration during scanning, which is beneficial for high-speed AFM systems. Using the easily accessible interfaces of the controllers used in the EDU-AFM1 kit, various concepts of high-speed scanning and non-raster data acquisition, developed in the MetExSPM EMPIR project, were successfully tested.
*The KSG101 is no longer available for individual purchase and has been replaced by KPC101. Please contact Tech Support if you are interested in this application.
 Click to Enlarge
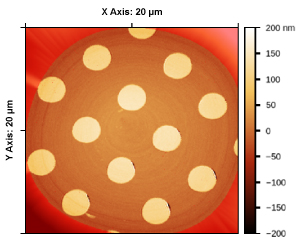
Figure 7: A spiral scan was taken with the Gwyscope controller and EDU-AFM1 kit using the test sample included with the kit. The red areas outside of the circle are not part of the scan.
 Click to Enlarge
Figure 6: EDU-AFM1 Kit Connected to the Gwyscope Controller and Laptop with Custom Software
 Click to Enlarge
Figure 5: Gwyscope Controller
Educational Atomic Force Microscope Image Gallery
The images below were all taken using Thorlabs' Educational Atomic Force Microscope (AFM). Of the samples shown below, the microstructure sample and blu-ray disc are included with the kit. If you would like to share your own AFM images, you can submit them to techsupport@thorlabs.com and we'll consider them for addition to the image gallery.
BudgetSensors HS100-MG Microstructure (Included with Kit)

Click to Enlarge
2D Image Taken with EDU-AFM Software
Click to Enlarge
3D View Generated by Post Processing in Gwyddion
Image of the BudgetSensors HS-100MG Microstructure included with the EDU-AFM1(/M) kit.
Acquisition Settings: Constant Force Mode, 250 Sampled Pixels, Default PID Settings, 200 Pixels/s Scan Speed
Blu-Ray Disc (Included with Kit)
Click to Enlarge
2D Image Taken with EDU-AFM1(/M)

Click to Enlarge
3D View Generated by Post Processing in Gwyddion
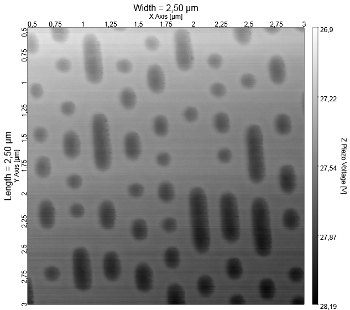
Image of the Blu-Ray Sample (Open Layer) included with the EDU-AFM1(/M) kit.
Acquisition Settings: Constant Force Mode, 250 Sampled Pixels, P = 0.8, I = 0.4, D = 0.2, 50 Pixels/s Scan Speed
AFM Stripe Artifacts
Click to Enlarge
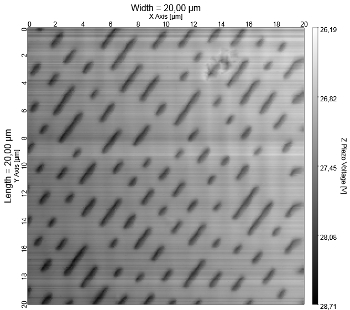
2D Image of Microstructure
Click to Enlarge
2D Image of CD
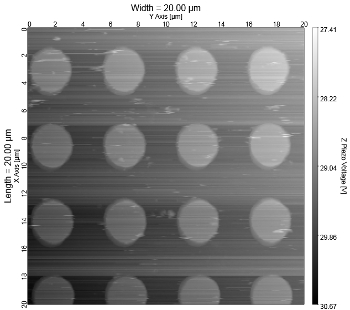
These images show examples of stripe artifacts caused by dust pushed over the surface of the microstructure sample by the probe tip (left) and the soft sample surface of the stamped CD structure (right).
Acquisition Settings: Constant Force Mode, 250 Sampled Pixels, Default PID Settings, 200 Pixels/s Scan Speed
Moth Eye Cones

Click to Enlarge
2D Image Taken with EDU-AFM1(/M)

Click to Enlarge
3D View Generated by Post Processing in Gwyddion
Image of Moth Eye Cones
Acquisition Settings: Constant Force Mode, 250 Sampled Pixels, Default PID Settings, 100 Pixels/s Scan Speed
Dried Blood Cell

Click to Enlarge
2D Image Taken with EDU-AFM1(/M)

Click to Enlarge
3D View Generated by Post Processing in Gwyddion with Colorized Overlay
Image of a Dried Blood Cell
Acquisition Settings: Constant Force Mode, 250 Sampled Pixels, Default PID Settings, 100 Pixels/s Scan Speed
Human Hair
Click to Enlarge
2D Image Taken with EDU-AFM1(/M)
Click to Enlarge
3D View Generated by Post Processing in Gwyddion
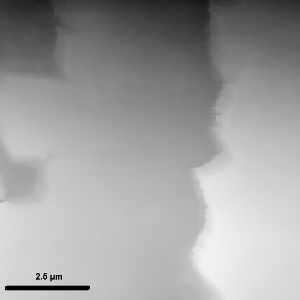
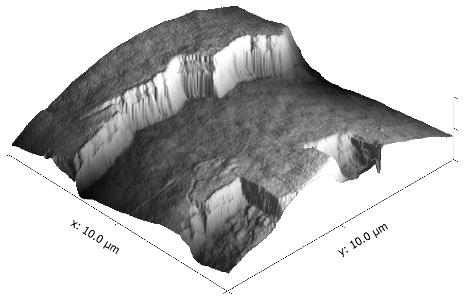
Image of a Human Hair
Acquisition Settings: Constant Force Mode, 100 Sampled Pixels, Default PID Settings, 100 Pixels/s Scan Speed
Cobalt Nanoparticles

Click to Enlarge
2D Image Taken with EDU-AFM1(/M)
Click to Enlarge
3D View Generated by Post Processing in Gwyddion
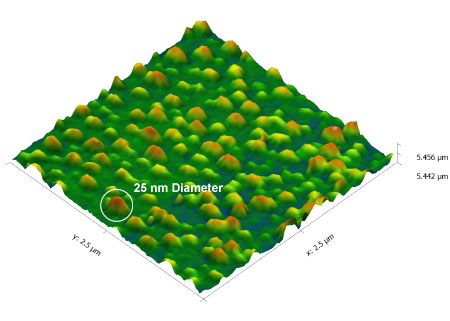
As an example, the Educational AFM Kit was used to image a PELCO® AFM Tip and Resolution Test Specimen, which consists of a single layer of cobalt particles. The particles are flattened half-spheres with a radius typically larger than the height and particles heights varying between 1 and 5 nm. When imaged with the EDU-AFM1, the measured particle size was approximately 25 nm in diameter. The tip diameter is approximately 15 nm, which results in a resolved particle size of 10 nm. Further information can be found in the manual.
Acquisition Settings: Constant Force Mode, 100 Sampled Pixels, Default PID Settings, 100 Pixels/s Scan Speed
User Images: Courtesy of Richard Becher (KIT)
These images, taken using the Educational AFM, were provided to Thorlabs by Richard Becher from the Karlsruhe Institute of Technology (KIT).
Gore-Tex®
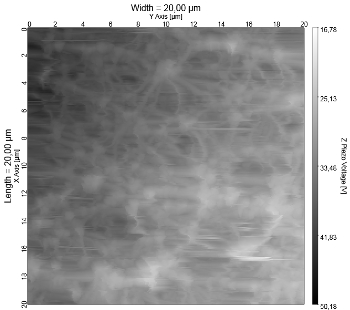
Click to Enlarge
2D Image Taken with EDU-AFM Software

Click to Enlarge
3D View Generated by Post Processing in Gwyddion
The pores in Gore-Tex® material are smaller than 1 µm, making them too small for water drops to pass through. Vapor can pass through the other side of the fabric, making this material both breathable and waterproof.
Acquisition Settings: Constant Force Mode, 250 Sampled Pixels, P = 0.2, I = 0.2, D = 0.2, 200 Pixels/s Scan Speed
Structures to Enhance Solar Cell Light Absorption
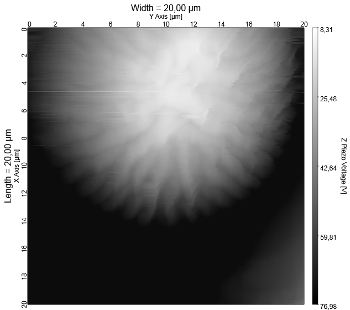
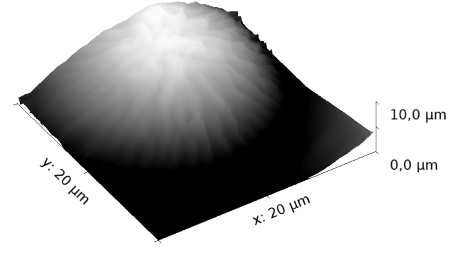
Click to Enlarge
2D Image taken with EDU-AFM1(/M)
The geometrical structure of rose petal skins enhances their light-absorbing capabilities. Scientists at KIT have applied materials molded to match this structure to the surface of solar cells, enhancing their light gathering capabilities. The images above are of one such structure. Sample courtesy of the Light Technology Institute at KIT Karlsruhe (www.lti.kit.edu).
Acquisition Settings: Constant Force Mode, 250 Sampled Pixels, P = 0.2, I = 0.2, D = 0.2, 100 Pixels/s Scan Speed
Synthetic Moth Eye Structures

Click to Enlarge
2D Image Taken with EDU-AFM1(/M)

Click to Enlarge
3D View Generated by Post Processing in Gwyddion
Moth eyes are covered in an array of light sensitive cones that reduce reflections at the air-chitin border. Materials with an array of cones that are the same size as those in a real moth eye are used in technology to make surfaces antireflective. Sample courtesy of temicon® (www.temicon.com).
Acquisition Settings: Constant Force Mode, 250 Sampled Pixels, Default PID Settings, 100 Pixels/s Scan Speed
Irridescent Butterfly Wing

Click to Enlarge
2D Image Taken with EDU-AFM1(/M)
The cascading nanostructures found on the wings of the Morpho Aega butterfly are responsible for its irridescent color. This sample is courtesy of Naturkundemuseum Karlsruhe (www.smnk.de).
Acquisition Settings: Constant Force Mode, 250 Sampled Pixels, Default PID Settings, 100 Pixels/s Scan Speed
Zinc-Nickel Deposition on Steel

Click to Enlarge
2D Image Taken with EDU-AFM1(/M)

Click to Enlarge
3D View Generated by Post Processing in Gwyddion
A steel panel was coated with a zinc-nickel (ZnNi) alloy for corrosion protection. The sample is courtesy of Integran Technologies (www.integran.com). The scan was taken at the University of Toronto Scarborough by Libertad Rojas in the group of Dan Weaver.
Acquisition Settings: Constant Force Mode, 250 x 250 Sampled Pixels, P = 1.2, I = 0.5, D = 0.2, 100 Pixels/s Scan Speed
Have you or your class taken an image with the EDU-AFM1(/M) that you would like to share? If so, email your photos to us at techsupport@thorlabs.com and we'll consider them for addition to the image gallery.
Laser Safety and Classification
Safe practices and proper usage of safety equipment should be taken into consideration when operating lasers. The eye is susceptible to injury, even from very low levels of laser light. Thorlabs offers a range of laser safety accessories that can be used to reduce the risk of accidents or injuries. Laser emission in the visible and near infrared spectral ranges has the greatest potential for retinal injury, as the cornea and lens are transparent to those wavelengths, and the lens can focus the laser energy onto the retina.
Safe Practices and Light Safety Accessories
- Laser safety eyewear must be worn whenever working with Class 3 or 4 lasers.
- Regardless of laser class, Thorlabs recommends the use of laser safety eyewear whenever working with laser beams with non-negligible powers, since metallic tools such as screwdrivers can accidentally redirect a beam.
- Laser goggles designed for specific wavelengths should be clearly available near laser setups to protect the wearer from unintentional laser reflections.
- Goggles are marked with the wavelength range over which protection is afforded and the minimum optical density within that range.
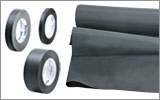
- Laser Safety Curtains and Laser Safety Fabric shield other parts of the lab from high energy lasers.
- Blackout Materials can prevent direct or reflected light from leaving the experimental setup area.
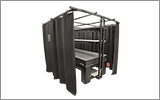
- Thorlabs' Enclosure Systems can be used to contain optical setups to isolate or minimize laser hazards.
- A fiber-pigtailed laser should always be turned off before connecting it to or disconnecting it from another fiber, especially when the laser is at power levels above 10 mW.
- All beams should be terminated at the edge of the table, and laboratory doors should be closed whenever a laser is in use.
- Do not place laser beams at eye level.
- Carry out experiments on an optical table such that all laser beams travel horizontally.
- Remove unnecessary reflective items such as reflective jewelry (e.g., rings, watches, etc.) while working near the beam path.
- Be aware that lenses and other optical devices may reflect a portion of the incident beam from the front or rear surface.
- Operate a laser at the minimum power necessary for any operation.
- If possible, reduce the output power of a laser during alignment procedures.
- Use beam shutters and filters to reduce the beam power.
- Post appropriate warning signs or labels near laser setups or rooms.
- Use a laser sign with a lightbox if operating Class 3R or 4 lasers (i.e., lasers requiring the use of a safety interlock).
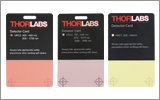
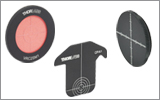
- Do not use Laser Viewing Cards in place of a proper Beam Trap.
Laser Classification
Lasers are categorized into different classes according to their ability to cause eye and other damage. The International Electrotechnical Commission (IEC) is a global organization that prepares and publishes international standards for all electrical, electronic, and related technologies. The IEC document 60825-1 outlines the safety of laser products. A description of each class of laser is given below:
| Class | Description | Warning Label |
|---|---|---|
| 1 | This class of laser is safe under all conditions of normal use, including use with optical instruments for intrabeam viewing. Lasers in this class do not emit radiation at levels that may cause injury during normal operation, and therefore the maximum permissible exposure (MPE) cannot be exceeded. Class 1 lasers can also include enclosed, high-power lasers where exposure to the radiation is not possible without opening or shutting down the laser. |  |
| 1M | Class 1M lasers are safe except when used in conjunction with optical components such as telescopes and microscopes. Lasers belonging to this class emit large-diameter or divergent beams, and the MPE cannot normally be exceeded unless focusing or imaging optics are used to narrow the beam. However, if the beam is refocused, the hazard may be increased and the class may be changed accordingly. |  |
| 2 | Class 2 lasers, which are limited to 1 mW of visible continuous-wave radiation, are safe because the blink reflex will limit the exposure in the eye to 0.25 seconds. This category only applies to visible radiation (400 - 700 nm). |  |
| 2M | Because of the blink reflex, this class of laser is classified as safe as long as the beam is not viewed through optical instruments. This laser class also applies to larger-diameter or diverging laser beams. |  |
| 3R | Class 3R lasers produce visible and invisible light that is hazardous under direct and specular-reflection viewing conditions. Eye injuries may occur if you directly view the beam, especially when using optical instruments. Lasers in this class are considered safe as long as they are handled with restricted beam viewing. The MPE can be exceeded with this class of laser; however, this presents a low risk level to injury. Visible, continuous-wave lasers in this class are limited to 5 mW of output power. |  |
| 3B | Class 3B lasers are hazardous to the eye if exposed directly. Diffuse reflections are usually not harmful, but may be when using higher-power Class 3B lasers. Safe handling of devices in this class includes wearing protective eyewear where direct viewing of the laser beam may occur. Lasers of this class must be equipped with a key switch and a safety interlock; moreover, laser safety signs should be used, such that the laser cannot be used without the safety light turning on. Laser products with power output near the upper range of Class 3B may also cause skin burns. |  |
| 4 | This class of laser may cause damage to the skin, and also to the eye, even from the viewing of diffuse reflections. These hazards may also apply to indirect or non-specular reflections of the beam, even from apparently matte surfaces. Great care must be taken when handling these lasers. They also represent a fire risk, because they may ignite combustible material. Class 4 lasers must be equipped with a key switch and a safety interlock. |  |
| All class 2 lasers (and higher) must display, in addition to the corresponding sign above, this triangular warning sign. |  |
|
| Posted Comments: | |
Daichi Hirobe
(posted 2024-11-03 16:37:55.64) I have a comment on the software supplied. I love it overall, but would like to have one point modified for better interpretation.
By default on the Constant Force Mode Tab, Y Axis is horizontal, X Axis is vertical, and (X, Y) is shown with respect to the origin of the sampled area. The presentation is confusing for Y Axis, because one needs to "invert" the obtained image at the middle of the Y Axis in order to reconstruct the actural topography of the sample. For example, if the actural topography viewed from the top is "C", the displayed image can be inverted "C".
Is it possible to modify the software such that the Y axis runs in the opposite direction (i.e., the Y coordinate is incremented from right to left)? For further flexibility, it would be desirable to have an option to choose which axis is horizontal and along which direction coordinate values are incremented.
Thank you for reading my feedback. hchow
(posted 2024-11-05 04:56:26.0) Dear Mr. Hirobe, thank you for your feedback, I will be sure to let our developers know about this issue. I will personally contact you to provide further troubleshooting steps. Thank you. user
(posted 2023-06-23 11:05:24.603) Hi. Is it possible to modify the software in order to aquire an additional signal? For example an optical signal such as in confocal microscopy? I think that the DAQ has an additional channel which is not used and that could be interfaced with a photodiode or a PMT output. If the software is written in labview this will require that you will provide the vi and not only the executable. Can you provide this? jkuchenmeister
(posted 2023-06-23 11:20:00.0) This is a response from Jens at Thorlabs: We can offer a modified version of the software that includes (1) a possible trigger input and (2) an additional output, measured by the unused DAQ channel. This feature is not currently part of our standard implementation but we plan on incorporating that next year. Please get in touch via e-mail so we can discuss specifics. user
(posted 2023-05-25 13:29:36.753) Hello! Does this AFM require optical lever sensitivity (OLS) calibration? GBoedecker
(posted 2023-06-01 08:57:48.0) Thank you for your feedback! Our educational AFM is designed for qualitative, not quantitative, force measurements. Therefore, no OLS is required in the scope of the educational purpose.
It might be possible to improve the accuracy of the force measurements via OLS, however we did not test that. user
(posted 2023-03-21 14:12:09.657) Hello. I'm using the AFM in constant force mode, closed loop with the MAX311D(/M) stage. I would like to change the Output Voltage Range of the Z Piezo Controller to a value below 75 V, but I can only choose between three values (75 V, 100 V, and 150 V) in the software's settings. How can I achieve that? Should I instead set it on the KPZ101? Thanks. fmortaheb
(posted 2023-03-23 12:38:05.0) Thank you very much for contacting us. We will reach out to you to discuss your application. user
(posted 2021-11-05 10:13:00.16) Hi,
I have the same problem as Zsuzsanna Marton.
I bought an AFM kit in December 2017.
I have recently change the computer with w7 to w10.
When we launch the software the controllers box stay empty.
What can we do ?
Thanks, mdiekmann
(posted 2021-11-11 03:27:03.0) Hello,
We will contact you directly to troubleshoot. Zsuzsanna Marton
(posted 2021-05-14 09:19:54.697) ur Institute of Physics in University of Pécs has purchased your educational AFM kit. I am assembling the setup just now, because there was a delay in refurbishment of the infrastructure. Now the hardware is operational, but I had some issues with the EDU-AFM software. First, I was not able to connect the devices. I checked with NI MAX that th USB6009 worked properly, but still, I was not able to identify the serial numbers of the controllers. Neither could I write them manually in the table. I also tried to update the EDU-AFM software, but I got the error message: no connection to the server. (The internet connection of my computer worked well.)
I am quite stuck at this point. Could you please advise me?
Sincerely yours,
Zsuzsanna Márton MKiess
(posted 2021-05-20 05:12:15.0) Dear Zsuzsanna, thank you very much for your inquiry. I have contacted you directly to provide further support. user
(posted 2020-12-11 09:11:34.933) Hello, I'd like to discuss the possibility of slowing the scan rate (sitting at each pixel much longer) and adding a trigger output to synchronize additional experiments being conducted via the EDU-AFM platform (we have one of these kits). If someone wouldn't mind contacting me about this, I would really appreciate it. Thanks so much. MKiess
(posted 2020-12-15 09:02:27.0) Thank you very much for your inquiry. I have contacted you directly to discuss further details. Marco Salerno
(posted 2020-01-24 01:31:39.723) Dear Sirs,
I would like to know if it is possible to work in lift (2-pass) mode, and bias the tip, such as to carry out quantitative EFM (i.e. surface potential, or scanning Kelvin probe) measurements.
Thank you in advance for any reply.
Best regards,
MS MKiess
(posted 2020-01-24 05:59:15.0) This is a response from Michael at Thorlabs. Thank you for your inquiry. I have contacted you directly to discuss the modification possibilities. Juan M. Merlo
(posted 2019-09-13 07:08:40.52) Hello,
My name is Juan M. Merlo and I'm a new Assistant Professor at Vassar College. I'll be purchasing several educational kits and optical components as my lab will be devoted to plasmonics research. In this sense, I'd like to know where should I send the New Lab Discount Application Form?
I appreciate your time and look forward to hearing your answer.
Best,
Juan M. Merlo YLohia
(posted 2019-09-13 08:26:42.0) Hello Juan, thank you for your interest in our products! The New Lab Discount Application Form should be sent to our sales team at sales@thorlabs.com. Fausto Franchini
(posted 2019-07-30 02:08:23.3) Good morning. Very nice kit!
I would like to ask if with ferromagnetic-sputtered tips MFM imaging could be also attempted with it.
Many thanks nreusch
(posted 2019-07-30 05:24:19.0) This is a response from Nicola at Thorlabs. Thank you for your inquiry. Unfortunately, MFM imaging is not available for the current version of our EDU-AFM1 kit. As we think this might be an interesting application, we will contact you directly to understand your requirements for future developments. user
(posted 2018-07-25 03:01:04.343) Hi. I would like to ask, how do we control the position of sample stage? Do we need to adjust it manually or automatically using the given software? swick
(posted 2018-07-30 03:35:36.0) This is a response from Sebastian at Thorlabs. Thank you for the inquiry.
The MAX311D sample stage consists of three micrometer screws and internal piezos with strain gauge feedback.
The coarse position of the sample is adjusted manually. Basically the micrometer screws could be swapped with stepper motors but these are not included in the kit and need separate controllers.
After setting the coarse position of the sample so when starting the scan in the EDU-AFM software, the piezos are used to control the fine scanning pattern of max 20µm x 20µm.
For assistance please contact your local techsupport@thorlabs.com iamjinwoo90
(posted 2018-06-18 00:14:11.617) Hi. I am Jinwoo.
I measured Al-hole array with 100 nm thickness using EDU-AFM1.
Measured Al-hole array image is very nice, but height profile of Al-hole array is reversed.
For example, Al is zero point and height of hole is 100 nm.
I wonder why height information is reversed.
Thank you mvonsivers
(posted 2018-06-18 07:53:21.0) This is a response from Leo at Thorlabs. Thank you for your inquiry. The data is inverted because the z-piezo retracts when the surface shows a feature. Therefore, we recommend the following steps in post processing:
Manual Section 9.2.1 „Invert Data - Since the raw data of the Z-deflection in constant force mode corresponds to the movement of the stage and not the elevation profile of the surface, the data has to be converted to the surface topography with Process Data -> Basic Functions -> Invert Values”
We will contact you directly to further discuss your application. desantic
(posted 2017-05-26 17:08:23.14) Is it possible to electrically contact the tip (i.e. to use it to probe or supply current or voltage)? jkuchenmeister
(posted 2017-05-29 08:53:53.0) A response from Jens at Thorlabs: The tip holder is connected to ground in the standard configuration (yellow and green cable that is fixed to the steel breadboard). You could decouple this connection and use it to supply a voltage to the tip holder. The tip holder itself is electrically decoupled from the rest of the setup through anodised parts. We will contact you personally to discuss your application design. |

- Includes Components to Build a Basic Atomic Force Microscope
- Requires a User-Supplied Optical Table or Breadboard with Damping Feet
- Recommended Nexus® Honeycomb Breadboard and Damping Feet Sold Below
- Determine Lateral Force and Force-Distance Measurements of the Included Microstructure Samples
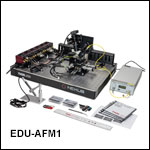
Thorlabs' EDU-AFM1(/M) Atomic Force Microscope Educational Kit includes the components to build a basic atomic force microscope. This educational kit is offered in both an imperial and metric version.
Atomic force microscopy offers fascinating insights into the world of nanostructures using the scanning probe method, which is based on a fine scanning probe, comprised of a flexible cantilever supporting a sharp tip with a radius less than 10 nm. For more details, see the AFM Basics tab. This kit features an AFM probe, a sample holder on a motorized stage with motorized closed-loop positioning control, a laser and four-segment photodiode detector for measuring the probe deflection, and the intuitive EDU-AFM software package to control the setup; see the Kit Components tab for a full list of the included components.
The AFM must be mounted on an optical table or breadboard, which is not included in this kit. If your lab does not already have a suitable one, we recommend using the B1824F Nexus® Honeycomb Breadboard with the AV5 Damping Feet for the imperial kits (B4560A with AV5/M, respectively, for metric kits), which are available for purchase separately below. Do not use a standard aluminum breadboard, as it will not sufficiently isolate the AFM from vibrations.

- B1824F (B4560A): 18" x 24" (450 mm x 600 mm) Honeycomb Breadboard
- 1/4"-20 (M6) Taps for Mounting Components
- Stable Surface for Mounting the EDU-AFM1(/M)
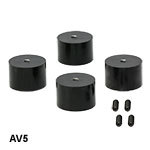
- AV5(/M): Sorbothane Damping Feet
- Designed to Aid in Damping Vibrations
- Include 1/4"-20 (M6) Screws to Mount Directly to a Breadboard
- Supplied as a Set of 4
The AFM in our EDU-AFM1(/M) kit must be mounted on an optical table or breadboard. As these are common in many labs, we have not included a breadboard in this kit. If you need to purchase a breadboard separately, we recommend the B1824F Nexus Honeycomb Breadboard with the AV5 Damping Feet for the imperial kit or the B4560A Nexus Honeycomb Breadboard with AV5/M Damping Feet for the metric kit, available here. Do not use a standard aluminum breadboard, as it will not sufficiently isolate the setup from vibrations.
 Products Home


 Click to Enlarge
 Click to Enlarge



 Zoom
Zoom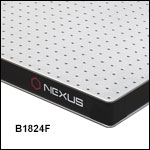
 Educational Atomic Force Microscope